Showing posts with label easy. Show all posts

Sunday, July 12, 2009

Hobo-Pack Rosemary Potatoes

Anyone can do this! Cut up some potatoes, a clove of garlic a little olive oil salt and pepper and toss to coat. Place a sprig of Rosemary and fold up the foil. Toss your Hobo-Pack on the grill, medium heat, with your steak or beer can chicken. After about 25 min open pack and test a spud with a knife. If you can put a knife in and it can slide off on it's own they are done.

Enjoy!
J.Jones

Tuesday, July 7, 2009

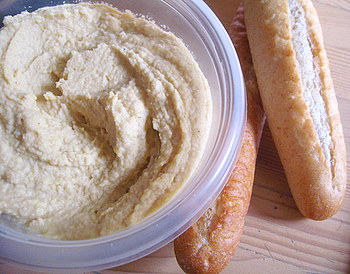
White Bean Hummus


I will be one of the peoples that will turn his nose up at Hummus. Not because Hummus itself is bad, its just that I have eaten some really nasty Hummus before. Unless I know the source I would rather make it myself.

Here is a really simple White Bean Hummus. This recipe begs to be modified to your desires.

White Bean Hummus
1 15oz Can Small White Beans
1/3 Cup nice oil such as Extra Virgin Olive Oil or Walnut
4 or so Garlic Cloves Sliced
1-2 Tablespoons Fresh Herbs chopped fine (rosemary, thyme, oregano etc..or a combination)
A squeeze of Lemon Juice
1/2 Cup of grated Parmesan or Romano Cheese
Salt and Pepper

In a small sauce pan add the oil, herbs and garlic. Cook over medium heat until fragient and slightly golden.

Meanwhile empty the drained and rinsed can of beans into the food processor, along with the squeeze of lemon and a little salt and pepper.

Once the oil herb mix is done pour that into the food processor and puree until smooth. Taste and adjust seasoning as you wish.

Smear some on a crusty piece of bread or to the thin crust pizza of your dreams and enjoy.

Another good idea: Make a little extra herb and garlic infused oil. Save some of that (removing the garlic) and brush onto both sides your bread slices and grill until golden brown. Then put that fantastic White Bean Hummus on it.

Enjoy!
J.Jones

pic

Wednesday, June 3, 2009

Make you own crackers (Goldfish not included)


It's easier than you think. Look at it this way. It's some bread dough you made that didn't rise. So turn it into a cracker. Press some seeds in the top, break them into cool shapes and look your an artist!

Cheddar Crackers

1/2 Cups Butter cut into cubes
1 1/2 Cups Flour Sifted
Good Pinch of Kosher Salt
1 teaspoons Baking Powder
1 dash Cayenne Pepper
2 Cups Extra Sharp Cheddar Cheese grated fine

Place all ingredients into a Food Processor except butter and cheese. Turn on for a moment to combine. With the motor running drop the butter in a couple at a time. Then add some of the cheese about 1/2 Cup at a time and pulse to combine. That should resemble a lump of dough. Dump it out onto piece of parchment paper and shape into a log a couple of inches around. Chill for 30 to 40 minutes in the refrigerator. With a serrated knife slice your crackers 1/4-inch
thick.

Bake on a half sheet pan at 400 degrees F for about 10 minutes. Remove from cookie sheet and let cool. Store the cooled crackers in airtight containers in a cool place.

Option: You could roll out that dough to about 1/4 inch thickness and cut with a knife or roller into squares or whatever.

Mix it up! Try different flours or cheeses. Add some nuts or seeds or herbs. It's easy and about as cheap a snack as you are going to get.

Enjoy!
J.Jones

Wednesday, May 20, 2009

Make some pasta...it's easy


orec·chi·et·te
Pronunciation:
\o-?ra-ke-'e-ta\
Function: noun
Etymology: Italian, plural of orecchietta, diminutive of orecchia meaning ear, from Latin auricula

Fresh Semolina Orecchiette Gourmet | January 2007

Makes about 1 1/2 pounds

ingredients
2 cups semolina (sometimes called semolina flour)
2 cups unbleached all-purpose flour
1 cup lukewarm water
preparation

Stir together semolina, flour, and a pinch of salt in a large bowl and make a well in center. Add lukewarm water to well and, using a fork, gradually stir in enough flour, pulling in flour closest to water, until a dough forms (some of flour mixture will not be incorporated). Transfer dough to a work surface.

Sift remaining flour mixture in bowl through a medium-mesh sieve into another bowl, discarding any hard clumps.

Knead dough, incorporating some of flour mixture as dough becomes sticky, until smooth and elastic, about 8 minutes.

Divide dough into 8 pieces, then wrap each piece separately in plastic wrap and let stand at room temperature 1 hour.

Line 2 large trays with dry clean kitchen towels (not terry cloth) and dust your hands with some remaining flour mixture. Remove plastic wrap from 1 piece of dough and roll dough on work surface to create a 1/2-inch-thick rope (2 to 3 feet long). Cut into 1/3-inch pieces with a sharp knife, separating pieces as cut so they do not touch. Lightly toss cut pieces with some remaining flour mixture.

Put 1 piece of dough, a cut side down, on work surface (if necessary, reform round shape; keep remaining pieces covered with a clean kitchen towel). Dust your thumb with some flour mixture and press down on dough, pushing away from you and twisting thumb slightly to form an indented curled shape (like an ear). Transfer to a lined tray. Make more orecchiette with remaining cut pieces in same manner, transferring to lined tray. Repeat rolling, cutting, and forming with remaining 7 pieces of dough in same manner, transferring to trays.

Cooks' note:
• Orecchiette can be made 2 days ahead and chilled on kitchen-towel-lined trays, wrapped with plastic wrap.

epicurious.com

Enjoy.
J.Jones

Monday, May 18, 2009

5 min bread


I have a minor love of bread. I really could take it or leave it. However making bread is so much fun! I really don’t mind measuring out flour and kneading bread is a cathartic act. But that will not stop me from trying to find better ways to do it. I had a great time with the No-Knead craze that took hold of the cooking world a couple of years ago. It was revolutionary and fit right in with my motto “there has got to be an easier way of doing this”. It was however very challenging when it came to timing. Those of you who have used his method know what I am talking about.

About the same time this crazy new way of making bread was coming out a Medical Doctor who moved from New York to Minnesota was experimenting in his own kitchen trying to find an easier way to make the bread he so loved in his home state. He met a chef they rubbed their brains together and Bing bang boom here we are with “Artisan Bread in Five Minutes a Day”.

This is a truly cool way to make bread. It’s a snap to mix up the dough and you really only need an hour or so to make the bread after that. The best part is after the dough is made you have up to 2 weeks to use it up. And the possibilities are endless!
If you are interested in their story check it out here: Star Tribune article 12/07/2007

So lets get down to the nitty gritty. I dont think I am telling tales out of school here when I give this recipe it is available here.

Master Bread Recipe
from “Artisan Bread in Five Minutes a Day”

Preparation time: 15 minutes to prepare enough dough for four loaves, to be baked over four days. Each daily loaf will average 5 minutes of active preparation time.

Makes four 1-pound loaves

  • 3 cups lukewarm water (about 100ยบ F)
  • 1 1/2 tablespoons granulated yeast
  • 1 1/2 tablespoons kosher or other coarse salt
  • 6 1/2 cups all-purpose white flour (no need to sift)
  • Cornmeal for the pizza peel
  1. In a 5-quart bowl, mix the yeast, water and salt. Add all the flour, then use a wooden spoon to mix until all ingredients are uniformly moist. It is not necessary to knead or continue mixing once the ingredients are uniformly moist. This will produce a loose and very wet dough.
  2. Cover with a lid (not airtight). Allow the mixture to rise at room temperature until it begins to collapse, about 2 hours, but no more than 5 hours.
  3. After rising, the dough can be baked immediately, or covered (non completely airtight) and refrigerated up to 14 days. The dough will be easier to work with after at least 3 hours refrigeration.
  4. On baking day, prepare a pizza peel by sprinkling it liberally with cornmeal to prevent the bread from sticking when you transfer it to the oven. Uncover the dough and sprinkle the surface with flour. Pull up and cut off a 1-pound (grapefruit-size) piece of dough (serrated knives are best). Store the remaining dough in the bowl and refrigerate for baking at another time.
  5. Hold the mass of dough in your hands and add a little more flour as needed so it won’t stick. Create a smooth ball of dough by gently pulling the sides down around to the bottom, rotating the ball a quarter-turn as you go. While shaping, most of the dusting flour will fall off. The bottom of the loaf may appear to be a collection of bunched ends, but it will flatten out during resting and baking. Shaping the loaf this way should take no more than 1 minute.
  6. Place the dough on the pizza peel. Allow the loaf to rest for about 40 minutes. It does not need to be covered. The bread may not rise much during this time.
  7. Twenty minutes before baking, place a pizza stone on the center rack of the oven. If you don’t have a baking stone, use another baking sheet. Remove any upper racks. Place a broiler pan on a rack below the pizza stone or on the floor of the oven. Preheat oven to 450 F.
  8. When the dough has rested for 40 minutes, dust the top liberally with flour, then use a serrated knife to slash a 1/4-inch-deep cross or tic-tac-toe pattern into the top.
  9. Slide the loaf off the peel and onto the baking stone. Quickly but carefully pour 1 cup of hot water into the broiler tray and close the oven door.
  10. Bake for about 30 minutes, or until the crust is nicely browned and firm to the touch. Allow the bread to cool completely, preferably on a wire cooling rack.

I have made with this dough:

  • Pizza Dough (cut off a piece and roll it flat and as round as you like, no need to proof)
  • Pitas (cut off a smaller piece than the pizza and roll it as flat as you can, no need to proof)
  • Rolls (take on big piece of dough and cut it into small equal sizes, roll with a cupped hand let the proof on a sheet pan)
  • Bread Sticks
  • Batard (picture above)

Enjoy some homemade bread. It doesn’t take much and it is very rewarding.

J.Jones

Flexible Casserole

Casserole

1 cup main ingredient
1 cup second ingredient
1-2 cups starchy ingredient
1 1/2 cups binder
1/4 cup “goodie”
seasoning
topping

Main ingredient: tuna, cubed chicken, turkey, ham, seafood, etc.
Second ingredient: thinly sliced celery, mushrooms, peas, chopped hard-boiled eggs, etc.
Starchy ingredient: thinly sliced potatoes, cooked noodles, cooked rice, etc.
Binder: cream sauce, sour cream, can of soup, etc.
“Goodie”: pimiento, olives, almonds, water chestnuts, etc.
Topping: cheese, bread crumbs, etc.

The Simple Dollar